

Every website on a cPanel server lives inside its own account: its own directory, its own system user, its own disk and bandwidth limits and its own cPanel. That separation is what stops one compromised site from reading another site’s files on the same server. So the first job after setting up a VPS or dedicated server with a cPanel licence is to create one account per site, rather than stacking several sites into a single account.
- A server running cPanel and WHM with an active licence. If it is not installed yet, see installing cPanel and WHM.
- Access to WHM as root at
https://your-server-hostname:2087(or the server IP on port 2087). Avoid the old port 2086: it is not encrypted. - A hosting package if you want fixed limits per customer; see creating a hosting package in WHM.
- The domain for the account. It does not have to point at the server yet, but visitors will not see the site until it does.
Where is the tool? #
WHM › Account Functions › Create a New Account
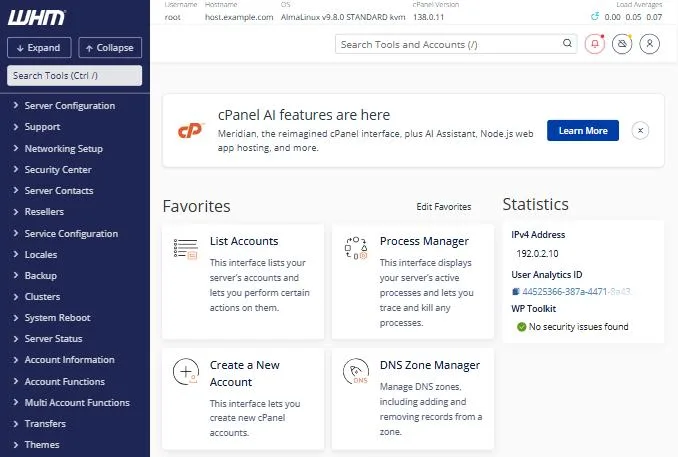
Or type Create into the search box at the top of the sidebar. It is also one of the default favourite cards on the WHM home page.
Part one: domain and login details #
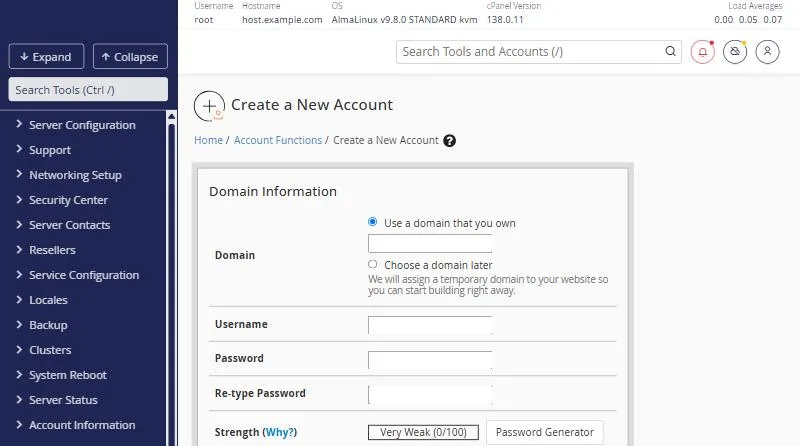
| Field | What to enter | Note |
|---|---|---|
| Domain | The site’s main domain, such as example.com, without www |
“Choose a domain later” gives the account a temporary domain you replace later |
| Username | The cPanel login name; WHM suggests one from the domain | Lowercase letters and digits only, cannot start with a digit or with “test”, 16 characters at most |
| Password and Re-type Password | The account password, twice | Password Generator makes a strong one; save it before closing |
| Strength | The password strength meter | If it stays red, WHM rejects it according to the server’s minimum strength |
| The owner’s address for notices and password resets | Do not use an address on the same domain: if the site breaks, so does its mail |
Part two: the package #
This is where you set the account’s limits: disk, bandwidth, and the number of mailboxes, databases and addon domains. You have two routes:
- Choose a Package: pick a ready-made package. Best when you host several customers, because editing the package later applies to every account on it.
- Select Options Manually: type limits for this account only. You can keep them as a new package with Save Manual Settings as a package.
If you change your mind later there is no need to delete the account; upgrades and downgrades are covered in changing an account’s package in WHM.
Part three: settings, mail and DNS #
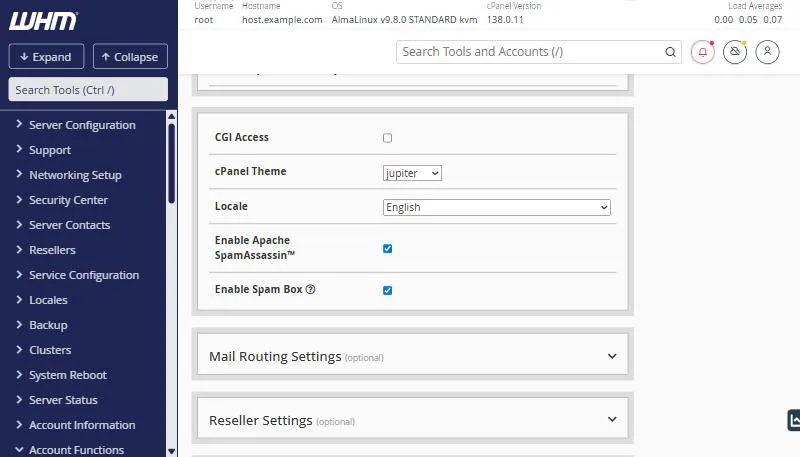
| Setting | The right choice for most sites |
|---|---|
| cPanel Theme | jupiter, the current cPanel interface |
| Locale | The language the owner prefers; they can change it themselves later |
| Enable Apache SpamAssassin and Enable Spam Box | Leave both on so incoming mail is scanned and spam is set aside |
| Mail Routing Settings | Automatically Detect Configuration, unless the domain’s mail is hosted at Google or Microsoft, in which case choose Remote Mail Exchanger |
| DNS Settings | Keep DKIM, SPF and DMARC enabled; they are what get the site’s mail into the inbox rather than spam |
| Reseller Settings | Only for an account that will resell hosting; see the reseller guide |
What actually happens when you click Create #
WHM shows a live log while it works. Behind it, in order: a new operating-system user is created, then /home/username with public_html inside it, then a DNS zone with the basic records, then the mail setup, and finally the domain is added to the web server configuration and, if AutoSSL is on, a free SSL certificate is requested. The log ends with a confirmation listing the account details.
Creation errors we see most #
| Message or symptom | Cause | Fix |
|---|---|---|
| Domain already exists on the server | It is already a main, addon or subdomain on another account | Find it in List Accounts and remove it from the old account first |
| Username rejected | Starts with a digit or “test”, has symbols, or is taken | Use a short name of letters and digits |
| Password too weak | Below the minimum set in Password Strength Configuration | Use Password Generator |
| Licence account limit reached | cPanel licences are priced by account count | Upgrade the licence or remove an unused account |
| Site does not load after creation | The domain is not pointed at the server IP yet | Update the A record or nameservers, then wait for propagation |
- The account appears in List Accounts with the cPanel icon next to it.
- Logging in to cPanel with the new details works.
- An SSL certificate was issued once the domain pointed here; track it in AutoSSL.
- You sent the owner the login link and username, and the password through a separate secure channel.
To manage the account afterwards: suspend it, change its bandwidth limit, change its password or terminate it.
Questions server owners ask #
Can I create an account without a domain ready?
Yes. Choose “Choose a domain later” to get a temporary domain, then change it from Modify an Account.
What is the difference between a cPanel account and an addon domain?
An account is separate, with its own user, files and limits; an addon domain shares an existing account’s files and limits. For different customers, always create separate accounts.
Can I change the username after creation?
Yes, from Modify an Account, but it renames prefixed databases and database users, so check the site’s configuration afterwards.
Does every account count towards the cPanel licence?
Yes. cPanel licences are priced by the number of accounts on the server, including resellers and their customers.
- How to Change a cPanel Account Password from WHM
- How to Create a Reseller Account in WHM
- Creating a Hosting Package in WHM: Resources and Settings Step by Step
- Suspending and Unsuspending a cPanel Account in WHM: Manage Account Suspension
- cPanel and WHM on a VPS — The Complete 2026 Guide: What They Are, Licensing, and When to Choose Them


